Using the In Operator to reduce SOQL calls
Skill level: Advanced
Salesforce recently added the IN and NOT IN Operators to the Flow Get Records element, this allows us to use a text array to get a series of records. An array is a group of things that are alike: a group of Contact records or a list of record ids.
This article is going to show you how to use the IN Operator to get records using a text array that you build dynamically. For example, let’s say you have a Custom Junction object that looks up to the Contact record and the Product record. And that you need to create Opportunities for all contacts associated with Enterprise accounts with a list of Opportunity Products for each product in that Contact Product Related list. You can set up a flow, use Get Records to get the Contact Products associated with the Contact and loop through them adding the Product Id to a text variable that allows multiple values. That variable contains the list of Product Ids and you use that variable to get all the Product records. If you didn’t use the IN Operator you would have to put a Get Records in the middle of your loop! This increases the SOQL queries that you are using and decreases your flow efficiency.
AVOID THIS: Don’t do lookups or updates in the middle of your loop!
Scenario:
Scott’s Bicycles sells bicycle accessories. Their customer service department can add products to a case - either replacement products or up-sell products. When they close the case the Sales department wants to automatically create an Opportunity with Opportunity Product Line Items. The problem is that Opportunity Products require a Price Book Entry Id and the Case Product doesn’t have that Id. You would have to do a lookup to the PriceBookEntry table with the PriceBook Id and the Product2Id - in the middle of your loop. Here’s how to avoid that.
Flow Set Up:
Create a Case Product object with lookups to the Product and the Case. Other fields you will need are Quantity and Price. Make sure you have a case record to test with and that the products you use have an entry in the Standard Price Book (we need the PriceBookEntryId!)
Add a Case Lookup to your Opportunity so you can easily navigate back to the Case. Add an Opportunity related list to your Case page layout.
Overview of Flow:
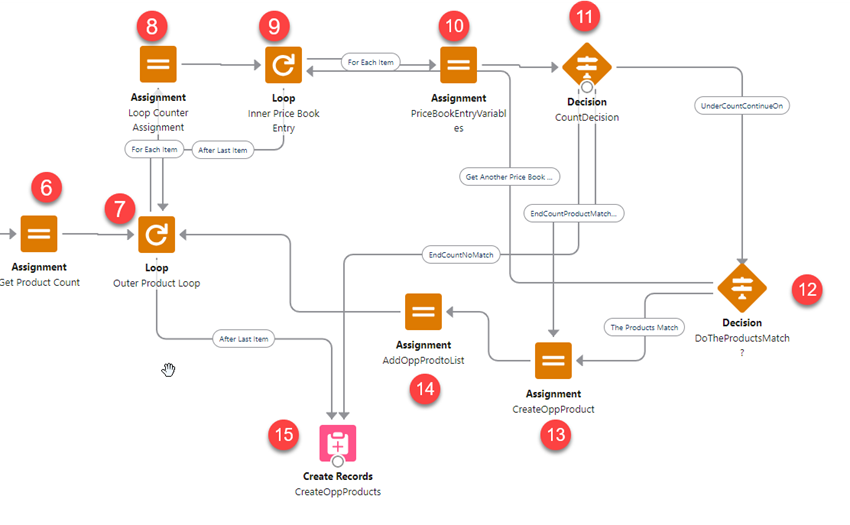
We will set up a Record Triggered Flow that will use Case data to populate the Opportunity data. Then we will get all the Case Product records and loop through the Case Products to create our list of Product Ids. That list of Product Ids will get our PriceBookEntry records. We will then loop through the Products again in an OUTER LOOP and match the ProductId with the PriceBookProductId in an INNER LOOP to get the PriceBookEntryId. Then we create our Opportunity Product Object with all our data and add that to our Opportunity Product Object Collection. When we are done with the Outer Loop we create the Opportunity Product records.
Start of Flow:
Create a record Triggered Flow that runs on the Case when the status equals “Closed.”
Create a text variable named vOpportunityId.
Create an Opportunity with the following map:
AccountId = Case Account (in my example we’ve renamed Account to Household)
CloseDate = Flow Current Date
Name = Case Subject
StageName = Closed Won
Case = Case.Id
Click Manually Assign Variables and select the Opportunity Id from your Create Opportunity element.

Get Your Case Products and Create your Product Text Array
Now we will get our Case Products using the Get Records element and Loop through them to grab the ProductIds in the Case Product records and put them in our text array. A lot of people find it easy to use the word List in their variable names to indicate if the variable is an array.. Once we have our text array of ProductIds we use the array to get our Price Book Entry Ids.
Drag a Get Records element to your canvas.
Get Case Products records where the Case–c field is equal to our record’s Case Id
Sort by Id in Ascending Order
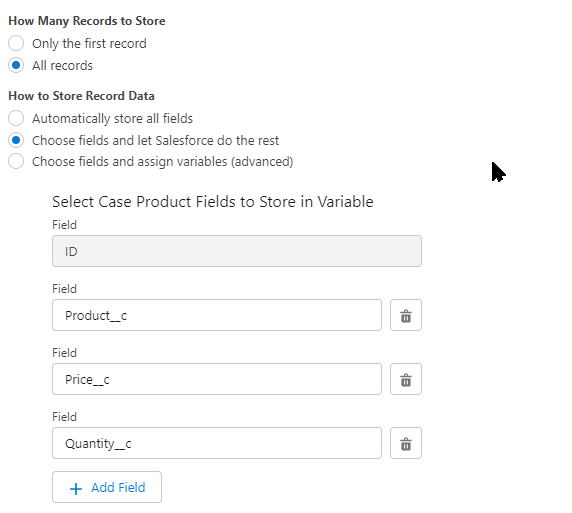
Store All Records
Chose fields and let Salesforce do the rest
Store the ID, Product__c, Price__c and Quantity fields
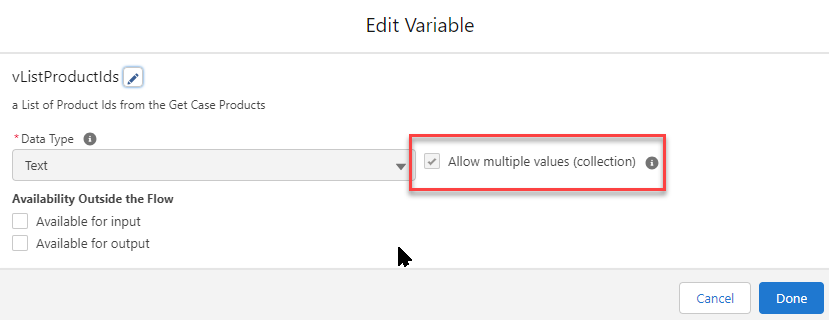
Create a variable called vListProductIds of a text data type type and click the Allow Multiple Values (collection) button
Create a variable called ListPriceBookEntryIds of a record data type, object = Price Book Entry and click the Allow Multiple Values (collection) button
Drag a Loop element onto the canvas and have it loop through your Get Case Products records
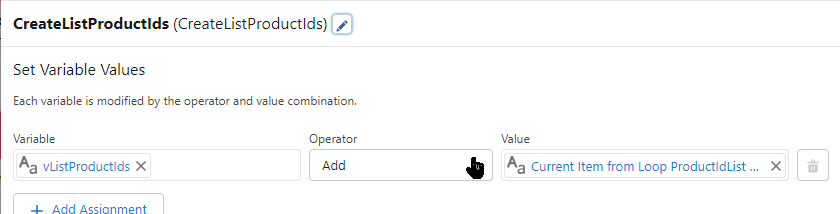
For each item in the list - create an Assignment element that adds the Product__c field from the Current Item in the loop to the vListProductIds variable you created earlier.
Save and test your Flow. Press the Debug button. Your variable should look like this: {!vListProductIds} = "[01t5e000004OIdwAAG,01t5e000004OIe0AAG,01t5e000004OIdvAAG]"
The text array starts with double quotes and a bracket and each id is separated by a comma and then ends with a bracket and double quotes. {!vListProductIds} = "[01t5e000004OIdwAAG,01t5e000004OIe0AAG,01t5e000004OIdvAAG]" If it doesn’t look like this then you didn’t click the Allow Multiple Values checkbox.
Now that we have our vListProductIds list we can use that list to get our pricebook entries.
Create a Get Records element called GetPriceBookEntryIds
Object = Price Book Entry
Conditions are Pricebook2Id = your standard pricebook Id and Product2Id IN vListProductIds
How Many Records to Store = ALL Records
How to Store Record Date = Choose Fields and Assign Variables
Create a Record Collection variable called ListPriceBookEntryIds
Store the ID field and the Product2Id
Your Get Records should look like this:


Create Counters
We now have two record collections - the Case Product Collection and the Price Book Entry Collection. The Case Product Collection will create the OUTER LOOP. The Price Book Entry Collection will create the INNER LOOP. We will start with a case product in our Outer loop, then we will loop through our pricebook entries and see if the pricebook entry product id matches the case product id. If it doesn’t match we check the next pricebook entry in the inner loop. When it matches we use the values in the case product and the matching price book entry id to create an Opportunity Product record which is then added to an Opportunity Product Collection variable. We need to set up some counters to count where we are in the Inner and Outer loops. Let’s set up some variables.
Create a number variable called vTotalNumberofProducts with 0 decimal places and 0 as a default value
Create a number variable called vOuterLoopCount with 0 decimal places and 0 as a default value
Create a number variable called vInnerLoopCount with 0 decimal places and 0 as a default value
Create a single record variable called vSingleOppProduct where Object = Opportunity Product
Create a collection record variable called vListOppProduct where Object = Opportunity Product and the Allow Multiple Values checkbox is checked.
Create a single text variable called vPBookEntryId
Create a single text variable called vPPBProduct2Id
Create Outer Loop and Inner Loop
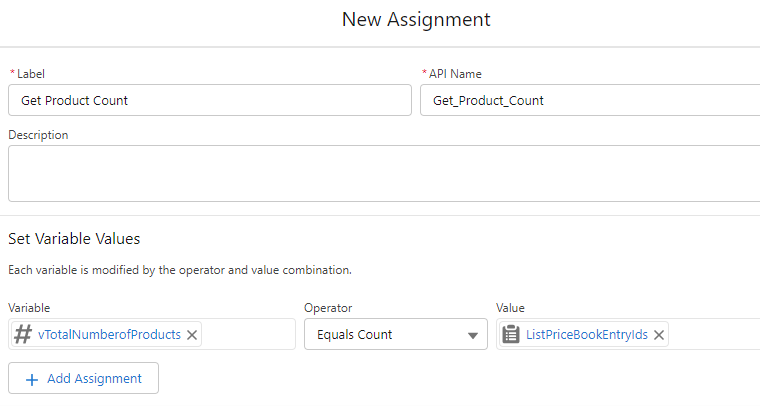
Drag an Assignment element onto your canvas and call it Get Product Count
Assign vTotalNumberofProducts to the Count of your GetPriceBookEntryIds
Drag a Loop element onto your canvas and call it Outer Product Loop and in the description write this Outer Loop loops through the Case Product and assigns variables to the Opportunity Product object variable
Add the Get Case Products collection to the Collection Variable field.
Drag an Assignment element onto your canvas and call it Loop Counter Assignment
Set vOuterLoopCount to Add 1
Set vInnerLoopCount to 0
The reason you are setting the vOuterLoopCount to Add 1 is so that we know where we are in the Outer Loop, the vInnerLoopCount is reset to 0 at the start of each Outer loop.
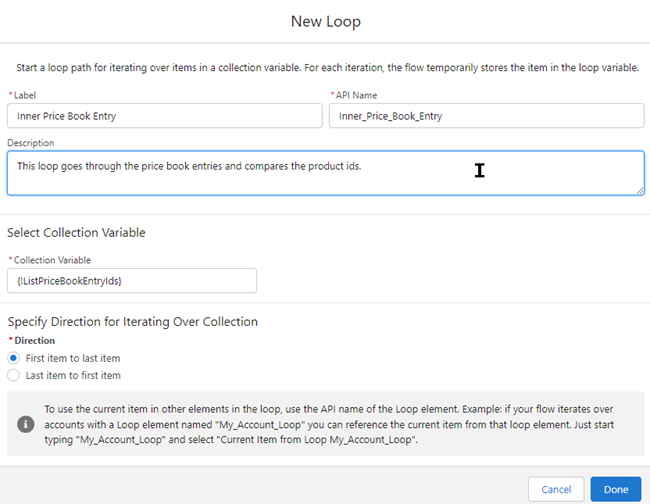
Drag a Loop element onto your canvas and call it Inner Price Book Entry and in the description write This loop goes through the price book entries and compares the product ids.
Add the ListPriceBookEntryIds collection to the Collection Variable field.
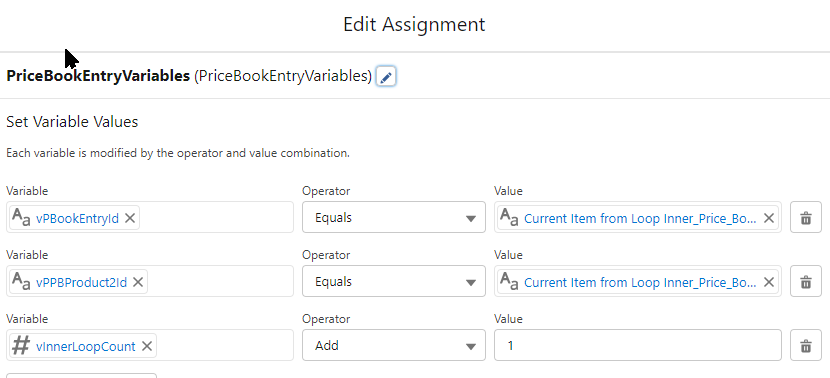
Drag an Assignment element to your canvas and call it PriceBookEntryVariables
Assign the current item from your Inner PriceBook PriceBookEntry Id equal vPBookEntryId variable.
Assign the current item from your Inner Price Book Product2Id equal vPBProduct2Id variable.
Assign your vInnerLoopCount ADD 1
Now we have our first case product record in the outer loop and our first price book entry ini our inner loop and we have set two variables without price book entry record data. Next we compare the ProductIds in the price book record and the case product record to see if they match. If they do, we continue on the outer loop. If not, we go back to get the next price book entry in the inner loop until we find a product that matches. Our Decision element tells us where we are and what will happen after.
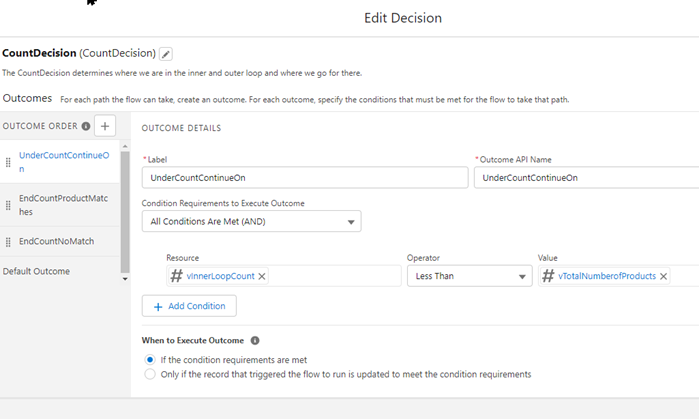
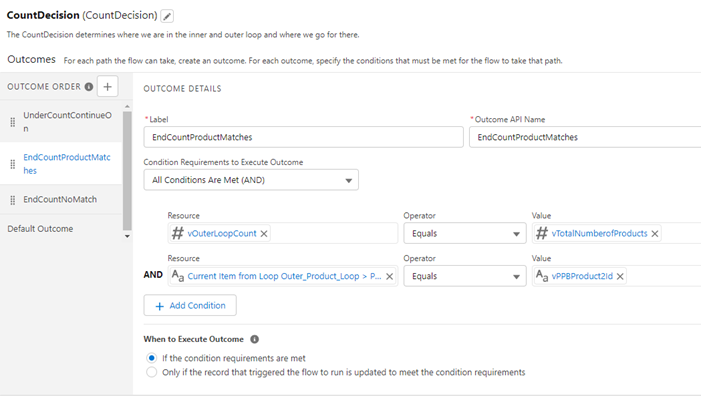
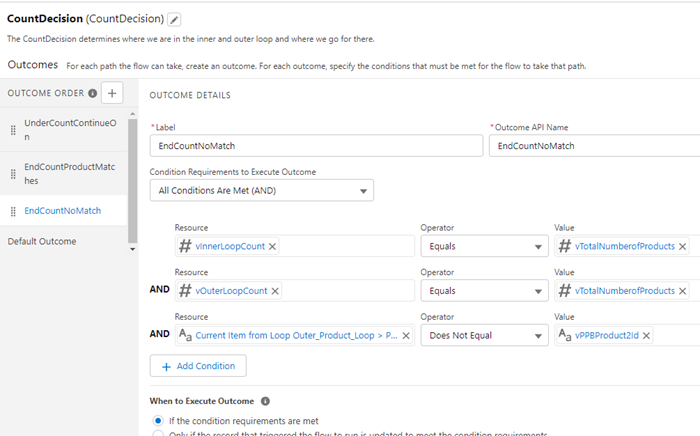
The CountDecision determines where we are in the inner and outer loop and where we go for there.
UnderCountContinueOn - Where are we in the Inner loop? If vInnerLoopCount less than vTotalNumberofProducts we are going to continue on to the next decision point
EndCountProductMatches - Are we at the last item in the inner loop and if the Product2Ids match then we need to continue on to creating the record.
EndCountNoMatch - if we are in the last item in the OUTER LOOP and the last item in the INNER LOOP we are done! And need to create our Opportunity Products
Drag a Decision element onto your canvas called CountDecision
Name the first UnderCountContinueOn and set the condition to vInnerLoopCount less than vTotalNumberofProducts
Name the second EndCountProductMatches set conditions to vOuterLoopCount equals vTotalNumberofProducts and Current Item from Outer Loop Products__c Id = vPBProduct2Id
Name the third EndCountNoMatch and set the conditions to vInnerLoopCount = EndCountNoMatch, vOuterLoopCount = EndCountNoMatch and Current Item from Outer Loop Products__c Id Not Equal to vPBProduct2Id
CountDecision should look like this:
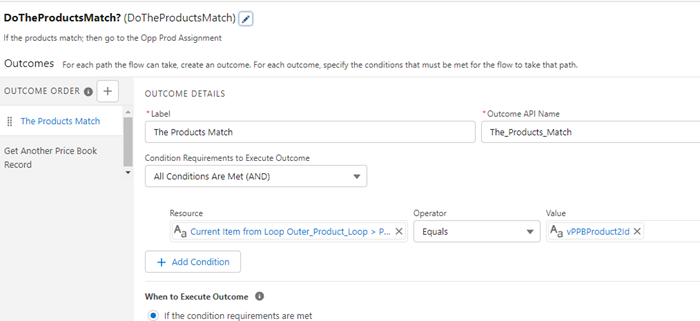
Drag a Decision element onto your canvas called DoTheProductsMatch?
Name the first decision The Products Match and set the conditions to Current Item from Outer Loop Products__c Id = vPBProduct2Id
Name the Default Outcome to Get Another Price Book Record
DoTheProducts Match should look like this:
If the products match, the next step is to create an Opportunity Product SObject variable with the info from our Case Product and then assign that Opportunity Product to the List of Opportunity Products Collection variable.
Drag an Assignment element onto the canvas and name it CreateOppProduct, set the fields as follows:
vSingleOppProduct.OpportunityId = vOpportunityId
vSingleOppProduct.Product2Id = vPBProduct2Id
vSingleOppProduct.PriceBookEntryId = vPBookEntryId
vSingleOppProduct.Quantity = Current Item from Outer_Product_Loop.Quantity
vSingleOppProduct.Quantity = Current Item from Outer_Product_Loop.Price
Drag an Assignment element onto the canvas and name it AddOppProdtoList and ADD vSingleOppProduct to vListOppProduct
Drag a Create Records element onto the canvas and call it CreateOppProducts, click the multiple records radio button and set the Record Collection field to our vListOppProduct collection variable.
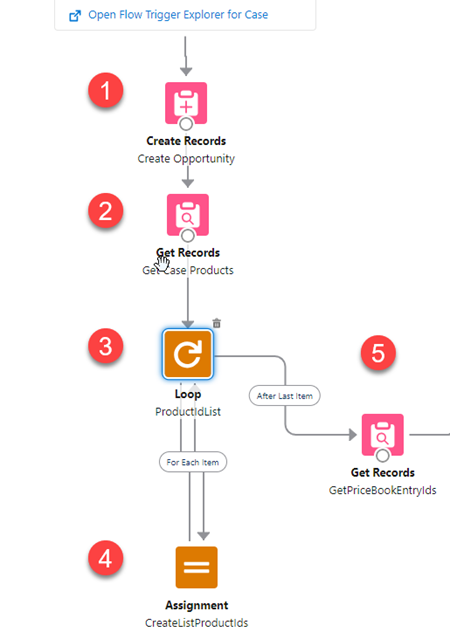
Connect the Elements and Test
We’re almost done. Now let’s connect our elements correctly. This first bit is easy.
CreateOpportunity
Get Case Products
Loop - for each Item
Assignment Create ListProductIds
After Last Item - connect to GetPriceBookEntryIds
The next bit, with the inner and outer loops and different decision points is more complex.
From 5 GetPriceBookEntryIds link to 6. Assignment Get Product Count
Get Product Bount links to 7 Outer Product Loop
From 7 Outer Product Loop - for each item - link to 8. Assignment Loop Counter Assignment
From 7 Outer Product Loop - After Last Item - link to 15. Create Records CreateOppProducts
From 8 Loop Counter Assignment link to 9 Inner Price Book Entry Loop
From 9 Inner Price Book Entry Loop - For Each Item - Link to 11 CountDecision
From 11 CountDecision -
Link UnderCountContinueOn to 12 Do the ProductsMatch?
Link EndCountProductMatch to 13 Create Opp Product Assignment
Link EndCountNoMatch to 15 CreateOppProducts
From 12 DotheProductsMatch Decision
Link The Products Match to 13 CreateOppProduct
Link Get Another Price Book Entry to 9 Inner Price Book Entry Loop
Link 13 CreateOppProduct to 14 AddOppProdtoList
Link 14 AddOppProdtoList to 7 Outer Product Loop
That’s it, we’re ready to save and test!